Installing the Bank Hapoalim app: הבדלים בין גרסאות בדף
מ (fix: use {{he}} for link to hebrew page instead of {{en}} (דרך WP:JWB)) |
|||
| (גרסת ביניים אחת של משתמש אחר אחד אינה מוצגת) | |||
| שורה 1: | שורה 1: | ||
| − | {{ | + | {{he|התקנת אפליקציית בנק הפועלים}} |
{{Navigation|Bugs and their solutions}} | {{Navigation|Bugs and their solutions}} | ||
| שורה 8: | שורה 8: | ||
| − | '''The solution:''' install the app | + | '''The solution:''' install the app with all four parts . |
'''<small>It should be noted that the problem was not intentionally created and it is likely that in the following versions of the app it will be fixed and this installation process will be unnecessary.</small>''' | '''<small>It should be noted that the problem was not intentionally created and it is likely that in the following versions of the app it will be fixed and this installation process will be unnecessary.</small>''' | ||
| שורה 17: | שורה 17: | ||
==== Via ADB: ==== | ==== Via ADB: ==== | ||
| − | '''Step 1:''' | + | '''Step 1:''' Download from [https://dl.google.com/android/repository/platform-tools_r28.0.2-windows.zip here] the ADB tool and extract to any folder. |
| − | should now be set to active | + | It should now be set to active. |
| − | '''Step 2:''' | + | '''Step 2:''' Activate '''USB debugging'''. |
This can be set by entering developer mode {There is a guide [https://hwzone.co.il/main-gadgets/%D7%9E%D7%93%D7%A8%D7%99%D7%9A-adb-%D7%9C%D7%90%D7%A0%D7%93%D7%A8%D7%95%D7%90%D7%99%D7%93-%D7%9C%D7%A0%D7%94%D7%9C-%D7%90%D7%AA-%D7%94%D7%A1%D7%9E%D7%90%D7%A8%D7%98%D7%A4%D7%95%D7%9F-%D7%9B%D7%9E/#aKMAJjwqPIEN here]} Go to Settings > About Tablet > click 7 times on ''build'' | This can be set by entering developer mode {There is a guide [https://hwzone.co.il/main-gadgets/%D7%9E%D7%93%D7%A8%D7%99%D7%9A-adb-%D7%9C%D7%90%D7%A0%D7%93%D7%A8%D7%95%D7%90%D7%99%D7%93-%D7%9C%D7%A0%D7%94%D7%9C-%D7%90%D7%AA-%D7%94%D7%A1%D7%9E%D7%90%D7%A8%D7%98%D7%A4%D7%95%D7%9F-%D7%9B%D7%9E/#aKMAJjwqPIEN here]} Go to Settings > About Tablet > click 7 times on ''build'' | ||
| שורה 26: | שורה 26: | ||
[[קובץ:Screenshot 2019-05-02-18-12-10.png|כניסה למצב פיתוח]] | [[קובץ:Screenshot 2019-05-02-18-12-10.png|כניסה למצב פיתוח]] | ||
| − | Now go to Settings > Developer Options | + | Now go to Settings > Developer Options, and mark Debugging. |
[[קובץ:Screenshot 2019-05-02-18-22-21.png|סימון ניפוי שגיאות]] | [[קובץ:Screenshot 2019-05-02-18-22-21.png|סימון ניפוי שגיאות]] | ||
| שורה 34: | שורה 34: | ||
| − | '''Step 4:''' | + | '''Step 4:''' After extracting, we will get a folder with 4 files which must be copied to the folder where ADB is located. |
גרסה אחרונה מ־04:11, 17 באוגוסט 2023
לעברית לחצו כאן
To switch from edit view to read view
Home page > Bugs and their solutions > Installing the Bank Hapoalim app
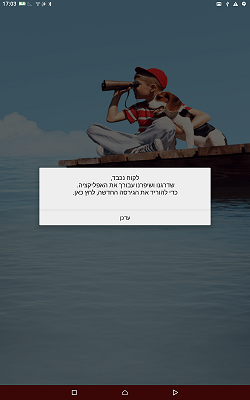
Description of the fault: The Bank Hapoalim app requests an update.
The solution: install the app with all four parts .
It should be noted that the problem was not intentionally created and it is likely that in the following versions of the app it will be fixed and this installation process will be unnecessary.
Via App Split APKs Installer:
Download the App from here, install it on the device and through it install the app parts.
Via ADB:
Step 1: Download from here the ADB tool and extract to any folder. It should now be set to active.
Step 2: Activate USB debugging.
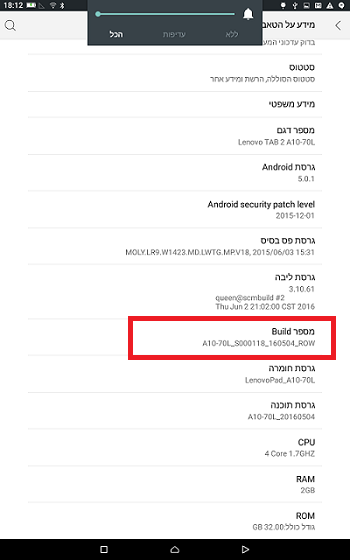
This can be set by entering developer mode {There is a guide here} Go to Settings > About Tablet > click 7 times on build
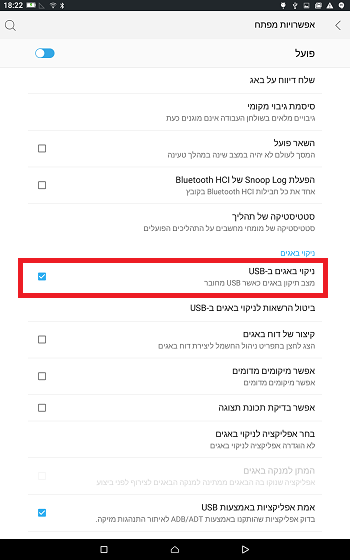
Now go to Settings > Developer Options, and mark Debugging.
Step 3: Download the apk files from here and extract to any folder.
Step 4: After extracting, we will get a folder with 4 files which must be copied to the folder where ADB is located.
Step 5: Browse to the folder where ADB is located by the command cd space folder path.
cd C:folder path
As in the example: (Of course change to the right path.)
Step 6: Make sure your device is connected to your computer. And run the following command:
adb install-multiple -r 1.apk 2.apk 3.apk 4.apk
Wait until you get 'Success'
Now launch the app and it should work properly.


